


This unique spring favor idea is from Martha Stewart Weddings.
These gorgeous favors are a great DIY idea for a bridal shower, baby shower or garden themed event!
It may not be dahlia season just yet, but that doesn't mean you can't channel this flower's intense color and festive attitude here and now. For these eye-catching favor pouches, we used bright tissue paper to create a pattern that mimics that bold beauty, then tied on a tag bearing planting instructions, and verdant ribbon to pose as leaves. At home, guests will peel back the petals to reveal a dormant dahlia bulb brimming with potential and just waiting to take root.

You will need:
Dahlia bulbs,

String or heavy thread
Ribbon
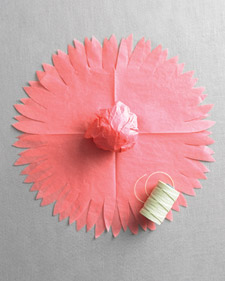
To wrap the bulb, stack two pieces of tissue paper and fold them in half side to side, then top to bottom.
Download the PDF of Martha's dahlia template, and print onto standard printer paper. Cut out template; then lay on top of folded tissue paper, aligning straight edges of template with the two folded edges of the tissue paper. Trace lightly around the template, and then cut on the line to create a tissue-paper dahlia. Open tissue paper and rotate top sheet slightly so the petal tips are staggered.
To make the tags, download the PDFs of both the initials tag and the planting-instructions tag.
For the initials tag, type in your first initials and event date. Print onto 8 1/2-by-11-inch card stock.

Using a 1 1/2-inch circle craft punch, punch out each tag. (Turn the craft punch upside down, so you can see the positioning of the design in the hole of the punch.)
Place an initials tag on top of an instructions tag, and use a small hole punch to make a hole through the top center of both tags.
Thread string through the holes and tie; trim ends.
Wrap a pretty ribbon around to cover up the string, and tie.


2 comments:
Super cute Idea!!
This idea is too cute!
Post a Comment