Showing posts with label DIY Wednesday. Show all posts

Wednesday, May 26, 2010

DIY Paper Pinwheels & Garlands

It's Wednesday, and we have a fab new DIY project for our Swanky Chicks! Check out these adorable paper pinwheels. They have been popping up in swanky parties all over the place. With this little tutorial we found on Style Me Pretty (one of our fav wedding blogs) you can create them for your next party!


Step #1: Supplies.
Pick your paper and buttons. *Hint*: text weight paper works best. Choosing coordinating patterns and colors for the paper is fun, and choosing different sizes and shapes in the buttons is cute, too. Choose scissors or a paper cutter, and adhesive. Cut 2 strips of paper, equal length and width, depending on the size of the pinwheel you want (thicker strips = larger pinwheel).
pinwheels
Steps #2 and #3: Folding + Combining.
Evenly fold (like an accordion) the 2 strips of paper. Make sure the widths match! (Note: smaller folds make tighter pinwheels. Larger folds are more loose and show more of the pattern. We like to make several of each size – makes for an adorable display). Line up one end of the folded accordion with the end of the other accordion. Fit together and adhere securely. Permanent adhesive squares work nicely, and lie flat.
pinwheels
Step #4: Securing.
Pull the loose ends of the accordion strip around towards each other and adhere securely. The pinwheel will look like a cardstock “circle” (similar to the coffee sleeves they give you at Starbucks). You will need to pop the pinwheel out and push it down (work with it until it looks like a pinwheel should look), holding it in place with your fingers. In the photo, the paperweight is doing the job of holding the pinwheel in place.
pinwheels
Step #5: Finishing Touches.
Choose your button and secure *tightly* with glue dots (you may need to use several!). Note: we recommend weighing the pinwheels down for several hours once they are fully assembled). This will help to ensure that they are secure.
String several pinwheels together to create a pinwheel garland. Scrap book paper, old sheet music and vintage books are great resources for gorgeous paper for this project. 


post signature

Wednesday, May 5, 2010

DIY Wednesday - Cupcake Stand

We just love all of the custom cupcake stands we see on some of the best desert tables, and we know you do to. We have a great tutorial for you on how to make your very own for your next event. These little cupcake stands are perfect for bridal showers, baby showers, and birthday parties.
Our tutorial comes to you today from Cake Journal via Candy and Cake! Thanks Ladies!


Satin ribbon for the cake board and the polysthyrene cake dummies
Thick paper or sugarpaste/rolled fondant icing
Glue stick and craft glue
Metal pins
A pair of scissors
A pencil
Step 1:
Start by glue the dummies together. So they can dry completely.

Step 2:
Take your chosen ribbon, and attach it on the dummies with a metal pin.
Note: you can also glue the ribbon on the dummies if you like.

Step 3:
When the dummies are dry, start by wrapping the ribbon around them so it slightly overlap all the way to the top.
Note: the metal pin on the picture, was only put in so I could take the picture.

Step 4:
Attach the ribbon with a metal pin.

Step 5:
Lay the cake boards on the chosen paper. Take your pencil and draw a line around the board on the paper. Cut out with a pair of scissors.

Step 6:
Take the glue stick and add glue thoroughly all over the board.

Step 7:
Place the paper circle on the cake board and rub it lightly.

Step 8:
Now it is time to attache the ribbon to the side of the cake board. Add a metal pin to just keep the ribbon in place.

Step 9:
If you like you can rub a bit of glue on the side so the ribbon stays in place. End by taking the metal pin and attach it to the overlaps.

Step 10:
Now your cake stand is finished.
Note: I have not assembled my cake stand with glue, but you could do that for an extra safety. If you use iced cake boards you can use royal icing to fix it if you like.


For details on where to buy materials and reader tips visit the original post at Cake Journal!

PS have you entered our giveaway yet? Check out last Fridays post to enter!
post signature

Wednesday, April 28, 2010

Rustic DIY Centerpiece

It's DIY Wednesday and we have a gorgeous rustic centerpiece project for you today! These centerpieces are perfect for creating a casual table setting with a rustic outdoorsy feel.  They were originally created as a wedding centerpiece but would work wonderfully for any event.
Project and Images Via: OnceWed 
 
What you will need:
· slice of wood ( 11′ diam x 2.5′ h)
· glass cylinder vases ( 11′h, 9′h, 6′h x 3.5′ diam) you can find these at
Jo-Ann Fabrics, Michael’s Crafts, and Hobby Lobby
· pillar candles ( 3 varying heights to fit in each vase)
· ribbon & yarn
· fabric, wood, or dried flowers
· double sided tape
· scissors

 Project and Images Via: OnceWed 

Instructions:
1. Cut 3 pieces of ribbon/yarn (one arms length per piece). Wrap each vase with ribbon/yarn. Attach ends of ribbon/yarn with double sided tape to surface of vase. I chose to wrap with a knobby yarn, satin ribbon, and grosgrain ribbon to create a variety of textures. I also wrapped the ribbon/yarn at different heights on each vase to create more interest.
2. Attach fabric/wood/dried flower to a piece of ribbon and tie around tallest vase.
3. Insert pillar candles into vases. arrange cluster of vases on wood slice, keeping the sides with the tape facing the center.
4. Arrange fabric/wood/dried flowers on wood slice around the vase cluster. Light the candles and enjoy your rustically elegant centerpiece!
FYI: The wooden flowers shown are no longer available for purchase. I would suggest creating fabric flowers or heading to a local craft store and picking up some dried botanicals. If you are interested in creating these centerpieces in large numbers, I would suggest ordering the vases in bulk.

P.S. We have an awesome giveaway coming up on Friday $50 worth of personalized labels or tags from SwankyChicks.com and Paperwed. We just launched a new preview tool where you can see your labels before you buy and in honor of that are giving away free tags or labels. Subscribe to our Blog via email in the top right hand corner,  or become a fan on facebook so that you don't miss out on this great giveaway!

post signature

Monday, April 26, 2010

Banana Sushi??????

Yes, we are serious banana sushi! The name sounds kinda gross but read the recipe and it sounds yummy. This recipe is a fun little twist on what we traditionally think of as sushi, don't worry no fish. Banana sushi can be served for breakfast, lunch or a snack and makes a great treat for kids and grown ups. The best part is it's healthy, delicious and easy! Click here for the recipe on ehow.
We found this recipe via Kinser Event Company. Their blog is full of gorgeous event inspiration, vendor reviews and this fun little recipe.  Kinser Events added a honey dipping sauce on the side!

 This recipe would make a great addition to a jungle themed party, or help to make the kids snack table look a little more grown up.
Instructions

Things You'll Need:

  • Banana
  • Peanut Butter
  • Bread
  • Knife
  • Rolling Pin
  1. Step1
    Take two slices of bread (whole wheat,whole grain, white) and remove the crusts completely.
  2. Step2
    Take the two slices of bread and overlap them slightly. While overlapped, take a rolling pin and roll the bread slices flat. This will also connect the two slices of bread at the point of overlap.
  3. Step3
    Take the peanut butter and spread a layer (thickness to your liking)evenly over the flattened slices of bread. Be sure that the bread is covered completely.
  4. Step4
    Take a medium sized ripe banana and remove the peel completely. Lay the banana on the bread. Be sure the banana is placed at one end of the bread so that you can roll it up.
  5. Step5
    With your knife, slice "sushi" sized pieces(about 1 inch thick) and arrange on a plate. You are now ready to enjoy your sushi!
    Tips & Warnings
    • Creamy peanut butter works best
    • If the banana is curved, straighten it slightly with your hands so that it rolls well in the bread.
    • Use whole grain or whole wheat bread for optimum nutritional value.
post signature

Wednesday, April 14, 2010

DIY Spring Centerpiece

We came across an adorable DIY project for a centerpiece over on the Hostess Blog. This project can easily be customized to coordinate with your event for a lovely centerpiece. Choose paper and ribbons to match your theme, change out the flowers, even change the birds to hearts, flowers, baby booties, a shape that coordinates for you! The project can be adapted for a baby shower, bridal shower, or birthday party with a little creativity.

YOU’LL NEED:

Small Bedding plants (English Daisies pictured here)
Shallow rectangular vase
Die-cut Chipboard Shapes (pictured here: Maya Road’s Song Bird Coasters)
Decorative Papers (pictured here: Craft Fair by American Crafts)
Lollipop sticks
Glue stick or spray craft glue , Hot Glue Gun, Scissors
Faux flower or other embellishment for the vase (optional)

Check out the Hostess Blog for the full DIY instructions.

 post signature

Wednesday, March 31, 2010

DIY Wednesday - Contain Your Joy

This adorable treat looks so delicious it is definitely on our grocery list for the next party. You know how we love practical double duty favors and this yummy desert does not disappoint. Guests can take home the concoction as a favor, or it can be served as desert and the cute container serves as a take home favor.
Cushion a vanilla cupcake between a layer of raspberry jam and a dollop of cream-cheese frosting in a classic canning jar. Pair it with a wooden spoon, and voila  -- you've got a pudding-rich, mess-free treat that guests can easily take home. Visit Martha Stewart for the delicious cupcakes in a jar recipe.


post signature

Wednesday, March 17, 2010

DIY Wednesday- Favor Boxes

We found some adorable wedding gown favor boxes on The Hybrid Chick that we just had to share with you! This project is high on style and low on budget, just how we like a DIY project. 
You will need heavy paper, white thread and needle, a printer, scissors, and lace for trim. You can view the full DIY tutorial at Hybrid Chick.

Tuesday, March 16, 2010

DIY Chandeliers

Check out these gorgeous chandeliers that a crafty Napa Valley couple made themselves! We are drooling over this gorgeous wedding and would love to try out this project. Head over to Style Me Pretty to see all of the wedding details.

For now here is some info on this awesome project from the bride.
We had a number of DIY projects — the biggest of which was making the chandeliers for the barn. We bought wood planks from a reclaimed barn, had a woodworker saw holes into them, glued mason jars in, dropped candles into the jars and strung them up with sailor’s rope. (And I want to note that, while we executed them, the ideas for the chandeliers and table runners came from our amazing designers at Atelier Joya)."

Wednesday, March 10, 2010

DIY Wednesday- Cake Pops

We gave you a little teaser last week about or DIY Wednesday post today and it is finally here! We have been drooling over the gorgeous cupcake pops that have been decorating desert tables at some of the swankiest parties. Now you can make them yourself and show everyone what a Swanky Hostess you are!
This DIY is  from Sandy a la Mode and the yummy blue and white cake pops she made for her nephews first birthday we featured last week.
Ingredients:
  • Red velvet cake mix
  • 16 oz. can cream cheese frosting
  • Colored candy melts
  • Lollipop sticks
Directions:
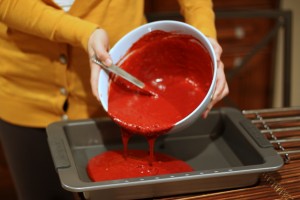
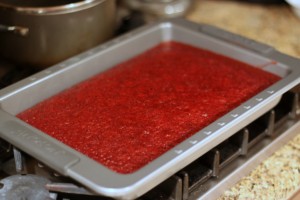
1. Make your own red velvet cake from scratch or buy a box from store and follow directions on box.  I did the latter.  =)
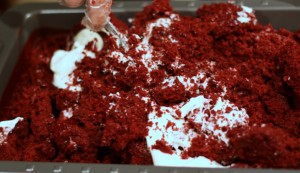
2. Let cake cool before thoroughly mixing in a 16 oz. can of cream cheese frosting.
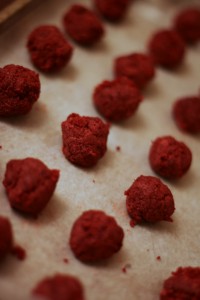
3. Form cake and cream cheese mixture into 1.25″-1.5″ balls and place on wax paper covered cookie sheet.  You should be able to make anywhere from 40-60 balls.   And wash your hands periodically as this can get real messy!
4. Put in fridge for a few hours or in freezer for 15 minutes.
5. While cake balls are chilling, melt colored candy melts in microwave.  I melted mine in a bowl for 2 minutes total, at 30 second intervals and stirring in between.
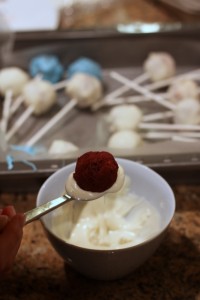
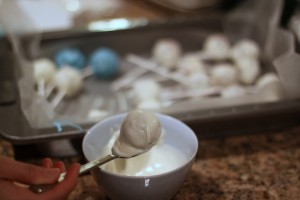
6. Dip cake balls in melted candy and coat thoroughly.  I used a spoon to help roll the balls around.
7. Dip end of your lollipop stick in the melted chocolate.  Let it dry right side up to ensure perfect roundness.  (I made holes in the bottoms of an egg carton and let the cake pops sit there until dry.)
8. You are now ready to display your cake pops in whichever fashion you choose!

Wednesday, March 3, 2010

DIY Wednesday FREE Printables

We have another gorgeous freebie for you this week! This one comes from Phyllis Hoffman Celebrates. These pink damask and lime green colored cupcake toppers and tent cards are to die for. I want to throw a party in these colors just so I can use theme. You can download them here.
And a coordinating baby shower game here.
The colors go perfectly with Swanky Chicks pink damask baby shower invitations and bridal shower invitations!

Wednesday, February 10, 2010

Easy Five Minute Flower Arrangements - DIY Wednesday

Floral arrangements are an integral and often time consuming part of any event, not to mention expensive. We have gathered a few gorgeous yet simple and inexpensive flower arrangement ideas that you can use at your next event.

Elevate a handful of single variety flowers, such as these ruffly poppies, with a proper collar of hosta leaves.
-Cut the hosta stems long so you can play with the width of the collar depending on the size of the flowers.
-Arrange hostas along the rim of the arrangement.
Credits: Better Homes and Gardens

Think Inside the Vase

 --Twist a small palm frond or banana leaf into a tall cylinder vase as a backdrop for a delicate white orchid branch. 

--Float a single blossom at the bottom of the vase and display.


For a look from Southern Living, use glass wasp catchers -- available in a variety of shapes, sizes, and colors -- as innovative vases. They're inexpensive, sturdy enough for outside or in, and pretty enough to dress up any setting.
For an easy centerpiece, group a few and fill with your favorite flowers.
 

Hydrangeas make a gorgeous flower arrangement, and a single stem can go a long way. Here a single stem was cut to sit low in cylindrical vases. Wrap the vase in ribbon that coordinates with your theme and you are done!
 
Peonies look great here cut short and placed in mint julep cups used as vases. Line the vases down the center of your table for an easy low centerpiece that doesn't keep your guests from talking across the table. Any variety of flower that coordinates with your theme would look wonderful as well. The key is to cut them short so they sit tight into a low vase and use multiple vases to create a dramatic effect. 


Wednesday, December 16, 2009

DIY Wednesday- Free Custom Printable

Free printable stationary! This awesome download from Custom Printables is totally FREE! Valerie's free designs would make a great bridal shower invitation. Personalized stationary for you to use at home. Beautiful baby shower invites or anything your heart desires.

The download includes 6x9 invitation (fits 6x9 envelope) 5.5x4 RSVP card, and5.5x4 Directions card (both fit A2 envelope). ZIP file includes both PNG and PDF files. Great for printing at VistaPrint or your home printer!

Wednesday, December 9, 2009

DIY Wednesday- Monogrammed Holiday Ornament

We have a great DIY projet for you this week. It's begining to look a lot like Christmas around here! The Holiday season is in full swing, and Swanky Chicks has a great monogrammed ornament tutorial.


Brides with a winter wedding this little project makes a lovely favor for your guests. Make the ornaments to color coordinate with your theme and monogram them with the year, the date, your monogram or your guests! Monogrammed ornaments are a great personalized gift for friends, family, and newlyweds.

To create these one of a kind ornaments you will need
Clear Ornament balls
Letter Stickers
Ribbon to match your theme
Shredded Paper for gift baskets in your colors

This project is a snap. Remove the tops of the ornaments and fill theme with your colored paper. Put the top back on and tie a matching bow with your ribbon. Lastly place your monogrammed sticker on the front. That's it your done and you have a boutique worthy ornament!
Special thanks to Kelly's Korner for this project idea. Surf on over to check out her adorable tree!


Related Posts with Thumbnails